Google Maps in Flutter
- Yulian Airapetov
- Jun 29, 2023
- 5 min read
In my last project, I needed to implement the functionality to create a route between two points on the map. The most popular tools for solving this problem are Google Map and Yandex Map. Solutions from yandex work more accurately in the CIS countries, in addition, there is less risk of falling under sanctions. However, Flutter does not yet have a stable implementation of the yandex map for the browser, but this was one of the main requirements of my project.
I decided to use Google Map, but I ran into a number of nuances. Let's show you how to create a cross-platform map application.
First of all, before writing the code, you need to get an API key to access Google Services. To do this, we will use the Google Cloud Console (https://console.cloud.google.com) and create a project.

Next, using the navigation menu on the left, go to the APIs & Services page and add Maps SDK for Android, Maps SDK for iOS, Places API, Directions API and Maps JavaScript API to our project.

The next step is to create API keys. It is better to use different API keys for different platforms (iOS, Android, web), however, to avoid confusion, I will create one key for all platforms.
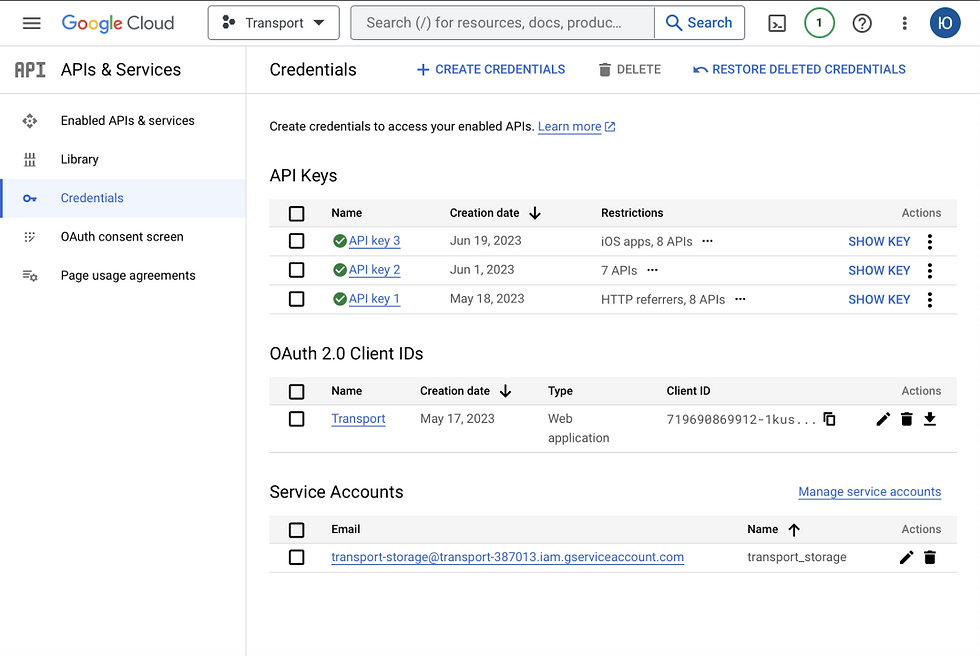
After creating the key, you need to configure the list of available APIs for this key.
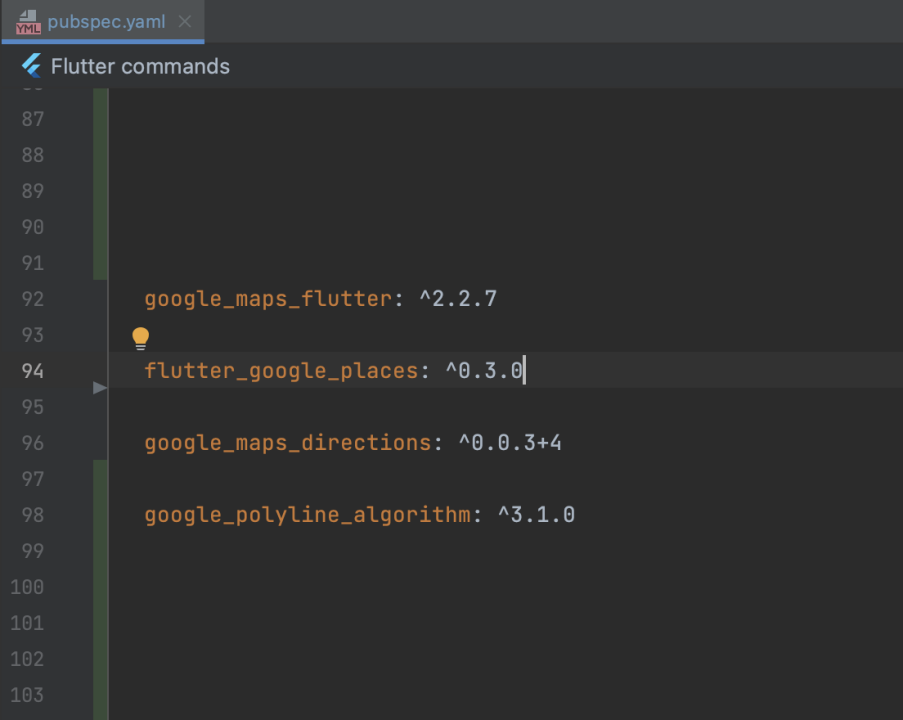
At this stage, the configuration is over, let's move on to writing the code. To implement the functionality described earlier, we need to add some libraries to our pubspec.yaml file.
Let's move on to setting up the configs. Open the file android/app/src/main/AndroidManifest.xml and write the following:
<application ...
    <meta-data android:name="com.google.android.geo.API_KEY"
               android:value="YOUR KEY HERE"/>
Set up iOS in ios/Runner/AppDelegate.swift file:
GMSServices.provideAPIKey("YOUR-KEY")Next, open ios/Runner/Info.plist and add:
<key>NSLocationWhenInUseUsageDescription</key>
<string>The app needs location permission</string>
For the map to work on the web, you need to add the following code to the web/index.html file:
<script async
src="https://maps.googleapis.com/maps/api/js?key=YOUR-KEY">
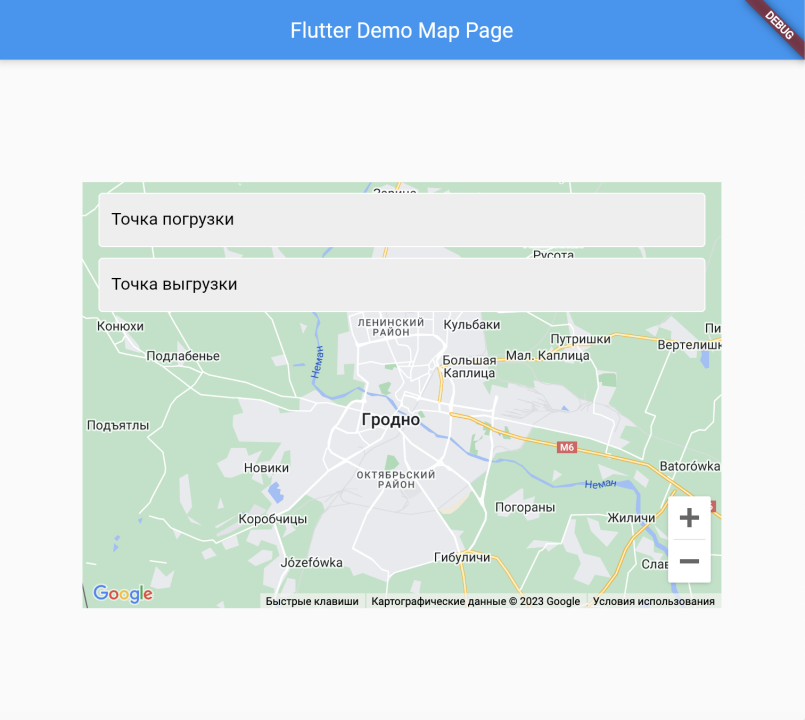
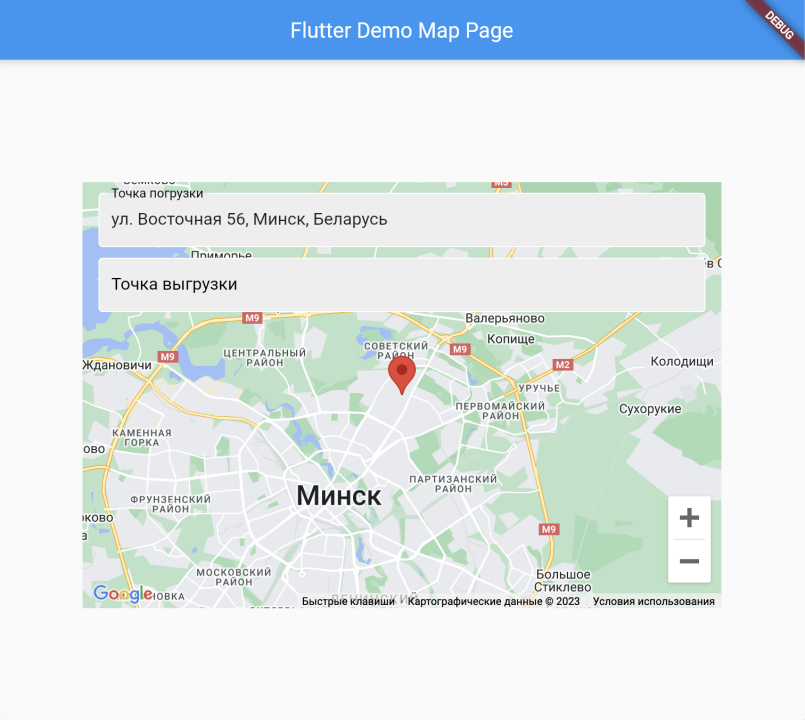
</script>After completing all the settings, we proceed to writing the code. Let's start by creating a StatefulWidget and call it MapView. As a parent element for the map, we use Stack to hang two TextFormFields on top of the map for entering addresses and a field for displaying distance and time.
return SizedBox(
width: 600,
height: 400,
child: Stack(
children: <Widget>[
GoogleMap(
onMapCreated: onMapCreated,
initialCameraPosition: CameraPosition(
target: _center,
zoom: 11.0,
),
markers: Set.from(markersList),
polylines: Set.from(polylines),
),
Positioned(
top: 10.0,
right: 15.0,
left: 15.0,
child: Column(
children: <Widget>[
AddressTextField('Точка погрузки', departureController, MarkerType.departure),
const SizedBox(
height: 10,
),
AddressTextField('Точка выгрузки', arrivalController, MarkerType.arrival),
const SizedBox(
height: 10,
),
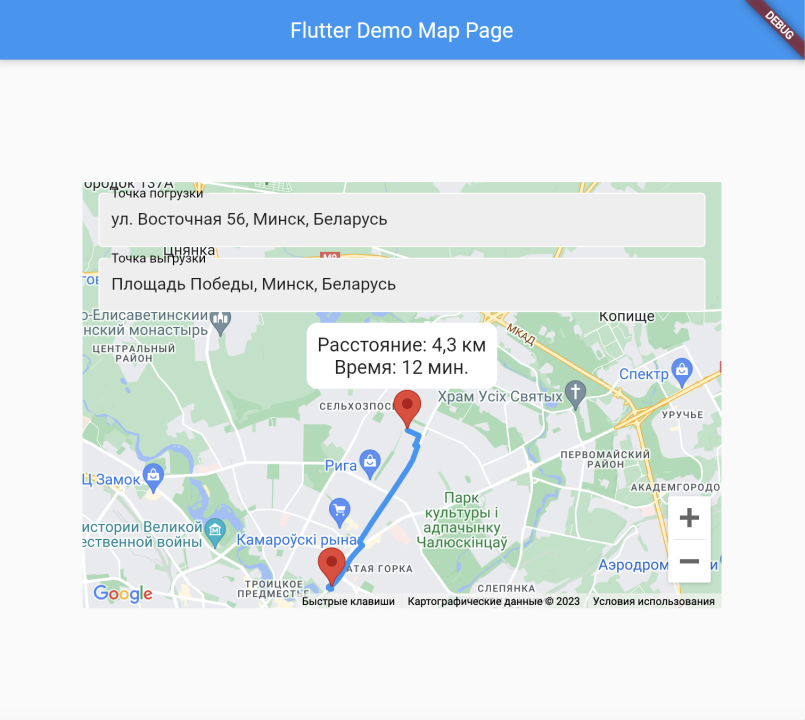
if (routeCreated) Container(
padding: const EdgeInsets.all(10),
decoration: BoxDecoration(
color: Colors.white,
borderRadius: BorderRadius.circular(10),
),
child: Column(
children: [
Text(
"Расстояние: ${totalDistance}",
style: const TextStyle(fontSize: 18),
),
Text(
"Время: ${totalTime}",
style: const TextStyle(fontSize: 18),
),
],
),
)
],
)
),
],
),
);The GoogleMap widget contains several properties for customizing the map, I will highlight the main ones:
myLocationEnabled, myLocationButtonEnabled - add a button and functionality for determining the geolocation.
zoomControlsEnabled - adds buttons to change the map scale
mapType - defines the map type (normal - default 2d map, hybrid - photographic map + roads and city names, sattelite - photographic map, terrain - map with mountains, rivers, etc.)
You can see the result in the picture below.
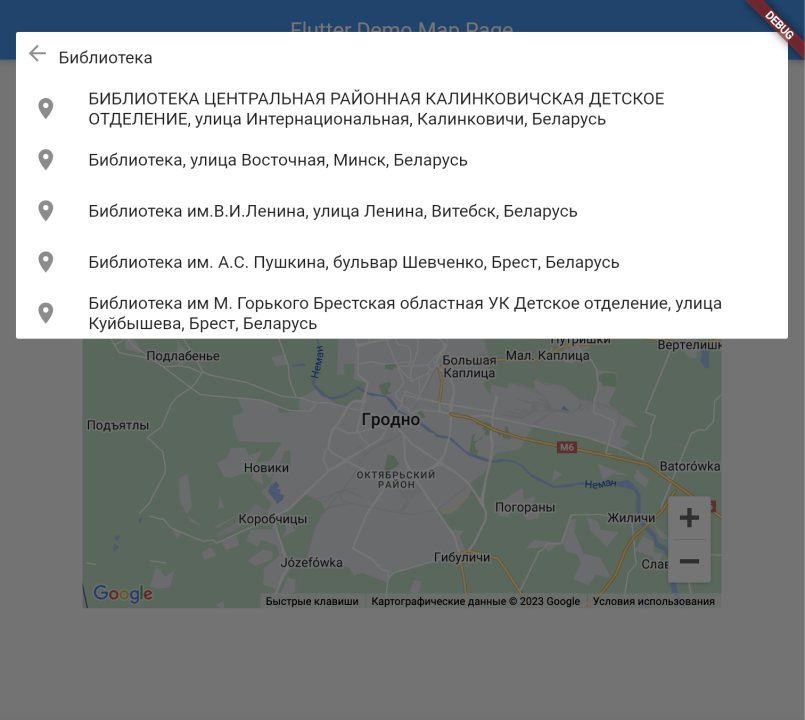
In turn, TextFormFields can be implemented as a separate reusable widget. This will not only reduce the writing of code, but also set the general style of the elements. To display the suggested places, let's add an event handler to our field that will receive the Prediction object from the PlacesAutocomplete.show method, which will display a list of similar places to select. This method can be customized, adding the language of the displayed result (in our case, 'ru'), countries to search for places, search radius, place display mode (fullscreen, overlay), and so on.
Widget AddressTextField(String label, TextEditingController controller, MarkerType type){
  return Container(
      decoration: BoxDecoration(
          borderRadius: BorderRadius.circular(10.0),
          color: Colors.white
      ),
      child: Column(
        children: <Widget>[
          TextFormField(
            decoration: InputDecoration(
              labelText: label,
              border: InputBorder.none,
              enabledBorder:  const OutlineInputBorder(
                  borderSide: BorderSide(color: Colors.white)
              ),
              focusedBorder: OutlineInputBorder(
                  borderSide: BorderSide(color: Colors.grey.shade400)
              ),
              fillColor: Colors.grey.shade200,
              filled: true,
              alignLabelWithHint: true,
              labelStyle: const TextStyle(color: Colors.black),
            ),
            controller: controller,
            validator: (val){
              if(val!.isEmpty){
                return 'Введите адрес!';
              }
            },
            onTap: () async {
              Prediction p = (await PlacesAutocomplete.show(
                  context: context,
                  apiKey: key,
                  offset: 0,
                  strictbounds: false,
                  types: [],
                  radius: 1000,
                  mode: Mode.overlay,
                  language: "ru",
                  components: [
                    Component(Component.country, "by")
                  ]))!;
              if (p != null) displayPrediction(p, type);
              FocusScope.of(context).requestFocus(FocusNode());
            },
            //onEditingComplete: searchAndNavigate,
          ),
        ],
      )
  );
}
After selecting a place, you need to create and call a method that will display the selected address in the search bar and on the map as a marker, and if two coordinates have already been entered, it will build a route.
To get the details of the selected place (latitude, longitude, etc.), let's create a GoogleMapsPlaces object, for this we need our key, the url to the Places API, and some headers.
final GoogleMapsPlaces _places = GoogleMapsPlaces(
    apiKey: "YOUR KEY",
    baseUrl: 'https://maps.googleapis.com/maps/api',
    apiHeaders: {
      'X-Requested-With': 'XMLHttpRequest',
      'Access-Control-Allow-Origin' : '*',
    }
);
Then we call the getDetailsByPlaceId method and pass the id of the previously selected place there. From the answer we get the latitude, longitude and full address. We will enter the address in the text field using the controller, and based on the latitude and longitude we will create a Marker, which we will add to the markerList associated with the map. In addition, we will move the focus of the map to the newly created marker (the moveCamera method).
Future<void> displayPrediction(Prediction p, MarkerType type) async {
  PlacesDetailsResponse detail = await _places.getDetailsByPlaceId(p.placeId!);
  final lat = detail.result.geometry?.location.lat;
  final lng = detail.result.geometry?.location.lng;

  setState(() {
    if (type == MarkerType.departure) {
      _departure = detail.result;
      departureController.text = detail.result.formattedAddress!;
    } else {
      _arrival = detail.result;
      arrivalController.text = detail.result.formattedAddress!;
    }
    setMarkers(type, lat, lng);
  });

  moveCamera(lat!, lng!);

  computePath();
}
Next, we will call the method for building the route, it will work only if both addresses are entered.
A route is an array of sequentially connected points. To get this array, you need to send a request to the Directions API and put the start and end coordinates into it. This functionality is implemented in the DirectionService.
class DirectionService {

  Future<DirectionsResponse> getRoute(String key, LatLng origin, LatLng end) async {
    var response = await http.post(Uri.parse(
        "https://maps.googleapis.com/maps/api/directions/json?key=" +
            key +
            "&units=metric&origin=" +
            origin.latitude.toString() +
            "," +
            origin.longitude.toString() +
            "&destination=" +
            end.latitude.toString() +
            "," +
            end.longitude.toString() +
            "&mode=driving"
    ));
    return DirectionsResponse.fromJson(jsonDecode(response.body));
  }
}
There are built-in methods for getting the route, but I haven't found one that works correctly, which would correctly decode the data from the response. Therefore, to process data from the API, we will create a DirectionResponse model. Google has many sites for generating a model from a json response, we can use one of them. To decode the points in the response, we will use the google_polyline_algorithm package, which provides the decodePolyline method.
class MyPolyline {
  late List<LatLng> points;

  MyPolyline({ required this.points});

  MyPolyline.fromJson(Map<String, dynamic> json) {
    points = decodePolyline(json['points']).map((e) => LatLng(e[0].toDouble(),e[1].toDouble())).toList();
  }

  Map<String, dynamic> toJson() {
    final Map<String, dynamic> data = <String, dynamic>{};
    data['points'] = points;
    return data;
  }
}
In the end, we will get all the data we need: points, time, distance, and a lot of everything for the future expansion of the functionality. To display the route on the map, let's create a new Polyline object and add it to the list of polylines associated with our map.
Bypassing all the nuances, we implemented the basic functions of Google Maps in Flutter, such as adding markers, moving the camera, etc. We also looked at how to work with routes and addresses. In general, Google Maps in Flutter provides many opportunities for creating high-quality maps and integrating them into applications on various platforms.
Useful links:
https://github.com/TwiXyl9/google_map_proj - repo with realization
https://pub.dev/packages/google_maps_flutter - gmap package
https://pub.dev/packages/google_polyline_algorithm - Googles Polyline Encoding lossy compression Algorithm package.
#flutter, #tutorial, #google_map, #dart, #google, #google_api, #learning, #study, #cross-platform, #flutter_web, #routes


Comentarios