Flutter Push Notifications with Firebase Cloud Messaging and Awesome Notifications
- Yulian Airapetov
- Oct 4, 2023
- 6 min read
The world of mobile apps is constantly evolving, and notifications are an integral part of this development. In this article, we'll talk about how to use Flutter and Firebase to integrate push notifications into your apps. I'll walk you through modern approaches to managing notifications, creating custom alerts, and more. Ready to learn how to make your app more interesting and engaging with push notifications? Let's start!

First of all, you need to log in to your account or register on the website console.firebase.google.com.
Next, you need to create a project and configure it. These actions are described in detail on the website. Then we move on to creating a database for storing tokens. A token refers to a unique device key that will be used for identification when sending notifications.
The database structure looks like this:

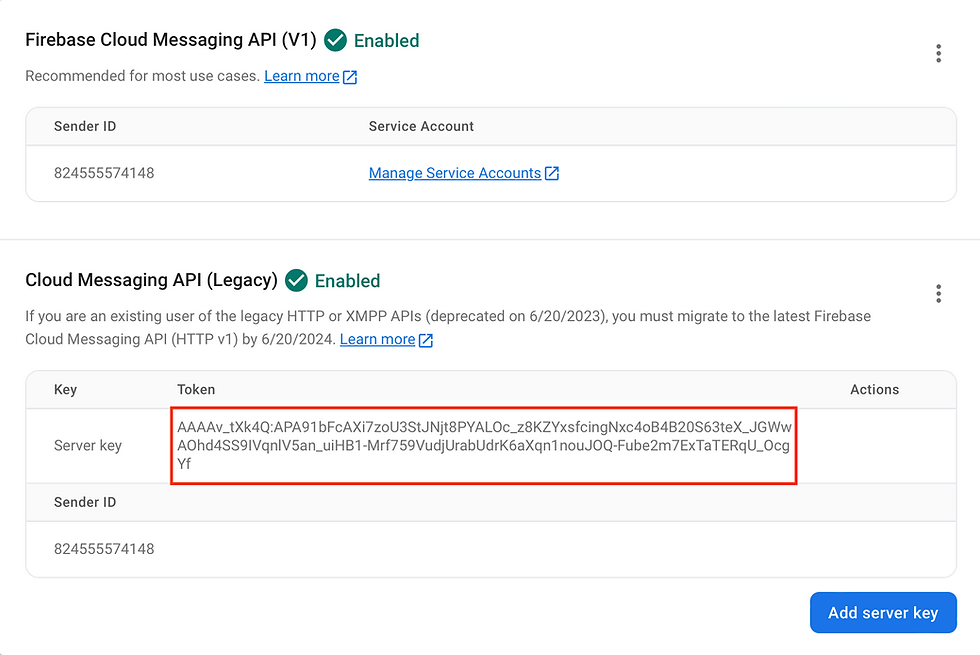
Next we need to get the server key, to do this we will open the project settings, then go to Cloud Messaging and remember it, we will need it later.
Let's move on to writing code. In this project we will need the following packages:

firebase_core - a Flutter plugin to use the Firebase Core API, which enables connecting to multiple Firebase apps
go_router - a declarative routing package for Flutter that uses the Router API to provide a convenient, url-based API for navigating between different screens
get_it - this is a simple service locator for Dart and Flutter projects with some additional goodies
awesome_notifications - create local notifications on Android, iOS and Web using Flutter
firebase_messaging - a Flutter plugin to use the Firebase Cloud Messaging API
cloud_firestore - a Flutter plugin to use the Cloud Firestore API
http - a composable, Future-based library for making HTTP requests
After installing all the dependencies, let's create a service for sending local notifications, let's call it notification_service. Let's define a method for basic initialization of our service.
static Future<void> initialize() async {
  await AwesomeNotifications().initialize(
      null,
      [
        NotificationChannel(
            channelKey: 'basic_channel',
            channelGroupKey: 'basic_channel',
            channelName: 'Basic notifications',
            channelDescription: 'Notification channel for tests',
            importance: NotificationImportance.Max,
            channelShowBadge: true,
            playSound: true,
            criticalAlerts: true,
            onlyAlertOnce: true,
            defaultColor: const Color(0xFF9D58D0),
            ledColor: Colors.white)
      ],
      channelGroups: [
        NotificationChannelGroup(
            channelGroupKey: 'basic_channel_group',
            channelGroupName: 'group_1')
      ],
      debug: true);
  await AwesomeNotifications()
        .isNotificationAllowed()
        .then((isAllowed) async {
    if (!isAllowed) {
      await AwesomeNotifications()
      .requestPermissionToSendNotifications();
      }
    });

  await AwesomeNotifications().setListeners(
      onActionReceivedMethod: onActionReceivedMethod,
      onNotificationCreatedMethod: onNotificationCreatedMethod,
      onNotificationDisplayedMethod: onNotificationDisplayedMethod,
      onDismissActionReceivedMethod: onDismissActionReceivedMethod);
}
In this method, we specify the basic parameters for our notifications, and also check access to send notifications, if it is not there, the system will display messages asking for permission to send. In addition, we create handlers for certain events, in our example, onActionReceivedMethod will be implemented.
Let's implement the show method to display notifications. Let's redefine several parameters with which you can change our notifications.
static Future<void> show({
  required final String title,
  required final String body,
  final String? summary,
  final Map<String, String>? payload,
  final ActionType actionType = ActionType.Default,
  final NotificationLayout notificationLayout = NotificationLayout.Default,
  final NotificationCategory? category,
  final String? bigPicture,
  final List<NotificationActionButton>? actionButtons,
  final bool scheduled = false,
  final int? interval,
}) async {
  assert(!scheduled || (scheduled && interval != null));
  await AwesomeNotifications().createNotification(
      content: NotificationContent(
        id: 0,
        channelKey: 'basic_channel',
        title: title,
        body: body,
        actionType: actionType,
        notificationLayout: notificationLayout,
        summary: summary,
        category: category,
        payload: payload,
        bigPicture: bigPicture,
      ),
      actionButtons: actionButtons,
      schedule: scheduled
          ? NotificationInterval(
          interval: interval,
          timeZone:
          await AwesomeNotifications().getLocalTimeZoneIdentifier(),
          preciseAlarm: true)
          : null
  );
}
As mentioned earlier, to send notifications you need a token of the device to which notifications will be sent. To access the database with tokens, we implement the token_repository class.
class TokenRepository {

  final firebaseFirestore = FirebaseFirestore.instance;

  void saveToken(String token, String userName) async {
    await firebaseFirestore
      .collection('user_token')
      .doc(userName)
      .set({'token': token});
  }

  Future<String> getToken(String userName) async {
    final doc = await firebaseFirestore
      .collection('user_token')
      .doc(userName)
      .get();
    return doc.data()!['token'];
  }
}
Next, we will implement a service for receiving notifications via FirebaseMessaging, let's call it firebase_messaging_service. In this class we also need to create a method for initialization, in which we check access to send notifications, get the device token and save it in the database, and also bind it to trigger when a new message is received in Firebase.
Future<void> handleMessage(RemoteMessage message) async {
  NotificationService.show(
    title: message.notification!.title!,
    body: message.notification!.body!,
    payload: Map<String,String>.from(message.data)
  );
}

class FirebaseMessagingService {

  final _firebaseMessaging = FirebaseMessaging.instance;

  Future<void> initNotifications() async {
    await _firebaseMessaging.requestPermission();

    final token = await getToken();

    TokenRepository().saveToken(token!);

    FirebaseMessaging.onBackgroundMessage(handleMessage);

    FirebaseMessaging.onMessage.listen((RemoteMessage message) {
      handleMessage(message);
    });
  }

  Future<String?> getToken() async {
    return await _firebaseMessaging.getToken();
  }

}
Let's move on to writing a method for sending messages to the Firebase server, which will then be displayed as notifications on our device. The method is to send a POST request using the http library.
class GoogleApiService {

  Future<void> postSendNotification(String title, String body, String token) async {
    try {
      await http.post(
        Uri.parse('https://fcm.googleapis.com/fcm/send'),
        headers: {
          'Content-Type': 'application/json',
          'Authorization': 'key=${GoogleApiKeys.SERVER_KEY}'
        },
        body: jsonEncode(<String, dynamic>{
          'priority': 'high',
          'data': <String, dynamic>{
            'click_action': 'FLUTTER_NOTIFICATION_CLICK',
            'status': 'done',
            'body': body,
            'title': title,
            'navigate': 'true'
          },
          'notification': <String, dynamic>{
            'title': title,
            'body': body,
            'android_channel_id': 'example_id'
          },
          'to': token
        }),
      );
    } on Exception catch (e) {
      print("Error with sending push notification - $e");
    }
  }
}GoogleApiKeys.SERVER_KEY needs to be replaced with the key of our server, which we received earlier. It is used to determine the server on which the message will be processed. Token is the identifier of the device to which this message will then be sent.
All that remains is to initialize Firebase and our services in the main file.
void main() async {
  WidgetsFlutterBinding.ensureInitialized();
  await Firebase.initializeApp();
  await FirebaseMessagingService().initNotifications();
  await NotificationService.initialize();
  runApp(const MyApp());
}
Now that we're done with the basic settings, let's create a page for sending notifications.
class HomeScreen extends StatelessWidget {

  final userNameController = TextEditingController();
  final titleController = TextEditingController();
  final bodyController = TextEditingController();

  HomeScreen({super.key});

  @override
  Widget build(BuildContext context) {
    return Scaffold(
      body: Container(
        padding: const EdgeInsets.all(15),
        child: Center(
          child: Column(
            mainAxisSize: MainAxisSize.min,
            children: [
              TextField(
                controller: userNameController,
                decoration: InputDecoration(
                    labelText: 'Name',
                    alignLabelWithHint: true,
                    labelStyle: TextStyle(color: Colors.grey[500]),
                ),
              ),
              const SizedBox(
                height: 10,
              ),
              TextField(
                controller: titleController,
                decoration: InputDecoration(
                  labelText: 'Title',
                  alignLabelWithHint: true,
                  labelStyle: TextStyle(color: Colors.grey[500]),
                ),
              ),
              const SizedBox(
                height: 10,
              ),
              TextField(
                controller: bodyController,
                decoration: InputDecoration(
                  labelText: 'Body',
                  alignLabelWithHint: true,
                  labelStyle: TextStyle(color: Colors.grey[500]),
                ),
              ),
              const SizedBox(
                height: 10,
              ),
              TextButton(
                  onPressed: () async {
                    final title = titleController.text;
                    final body = bodyController.text;
                    final userName = userNameController.text;
                    final token = await TokenRepository()
                      .getToken(userName);
                    if(title.isNotEmpty &&
                      body.isNotEmpty &&
                      userName.isNotEmpty) GoogleApiService()
                      .postSendNotification(title, body, token);
                  },
                  child: const Text('Send'),
              )
            ],
          ),
        ),
      ),
    );
  }
}
The page consists of fields for entering the username, title and body of the future notification, as well as a button for sending the notification. And it looks like this:

When you click the Send button, the following notification appears.

Let's create another page that will go to when you click on the notification. We will display the title and body of the notification on the page.
class NotificationScreen extends StatelessWidget {

  final String title;
  final String body;

  const NotificationScreen({super.key, required this.title, required this.body});

  @override
  Widget build(BuildContext context) {
    return Scaffold(
      appBar: AppBar(
        leading: IconButton(
          icon: const Icon(Icons.arrow_back_ios),
          onPressed: () => locator<NavigationService>().goBack(),
        ),
      ),
      body: Container(
        padding: const EdgeInsets.all(15),
        child: Center(
          child: Column(
            mainAxisSize: MainAxisSize.min,
            children: [
              Text(title),
              const SizedBox(
                height: 10,
              ),
              Text(body),
            ],
          ),
        ),
      ),
    );
  }
}
Now let's configure navigation using the go_router package. Let's create a navigation_service and describe our routes.
class NavigationService {
  final GlobalKey<NavigatorState> navigatorKey = GlobalKey<NavigatorState>();

  final GoRouter router = GoRouter(
    routes: [
      GoRoute(
        path: rootRoute,
        builder: ((context, state) => HomeScreen())
      ),
      GoRoute(
          name: notificationRoute,
          path: notificationRoute,
          builder: ((context, state) {
            final title = state.queryParameters['title']!;
            final body = state.queryParameters['body']!;
            return NotificationScreen(title: title, body: body);
          })),
    ],
  );

  void navigateTo(String routeName, {data = null}) {
    router.push(routeName, extra: data);
  }

  void navigateToWithParams(String routeName, Map<String, String> params) {
    router.pushNamed(routeName, queryParameters: params);
  }

  void goBack() {
    router.pop();
  }
}
We will pass our data between pages via queryParameters.
Next, using getIt, we organize access to an instance of our service. Let's create a locator.
GetIt locator = GetIt.instance;

void setupLocator(){
  locator.registerLazySingleton(() => NavigationService());
}
Let's add a call to this method in main. Then in MyApp we will create MaterialApp.router.
Widget build(BuildContext context) {
  return MaterialApp.router(
    title: 'Flutter Demo',
    theme: ThemeData(
      colorScheme: ColorScheme.fromSeed(seedColor: Colors.deepPurple),
      useMaterial3: true,
    ),
    routerConfig: locator<NavigationService>().router,
  );
}
At the final step, you need to add the onActionReceivedMethod method, which will be called when you click on the notification.
static Future<void> onActionReceivedMethod(ReceivedAction receivedAction) async {
  final payload = receivedAction.payload ?? {};
  if (payload['navigate'] == 'true') {
    locator<NavigationService>().navigateToWithParams(notificationRoute, {'title': payload['title']!, 'body': payload['body']!});
  }
}
In this method, we take data from the payload and send it to a new page through the navigation.
Ultimately we should get the following:

Useful links:
https://github.com/TwiXyl9/notification_project - repo with realization
https://firebase.google.com - firebase official website
https://pub.dev/packages/awesome_notifications - awesome_notification package
https://pub.dev/packages/firebase_core - plugin for firebase
https://pub.dev/packages/firebase_messaging - plugin for firebase_messaging


Comments