In the last article, we looked at creating a simple android widget that displayed a character image and name.
Today we will create a more informative widget that will contain a chart of the character's victories. From the point of view of the native part, the code will not differ much from the previous widget, it will still only work with images and text.
Let's take the application created in the last article as a basis. If you haven't read it yet, I suggest you do so and then come back here.
Well, let's start by adding another collection to our database, which will contain the percentage of the character's wins by day. Let's call it "winRate" and use the id of our characters as the Document ID.
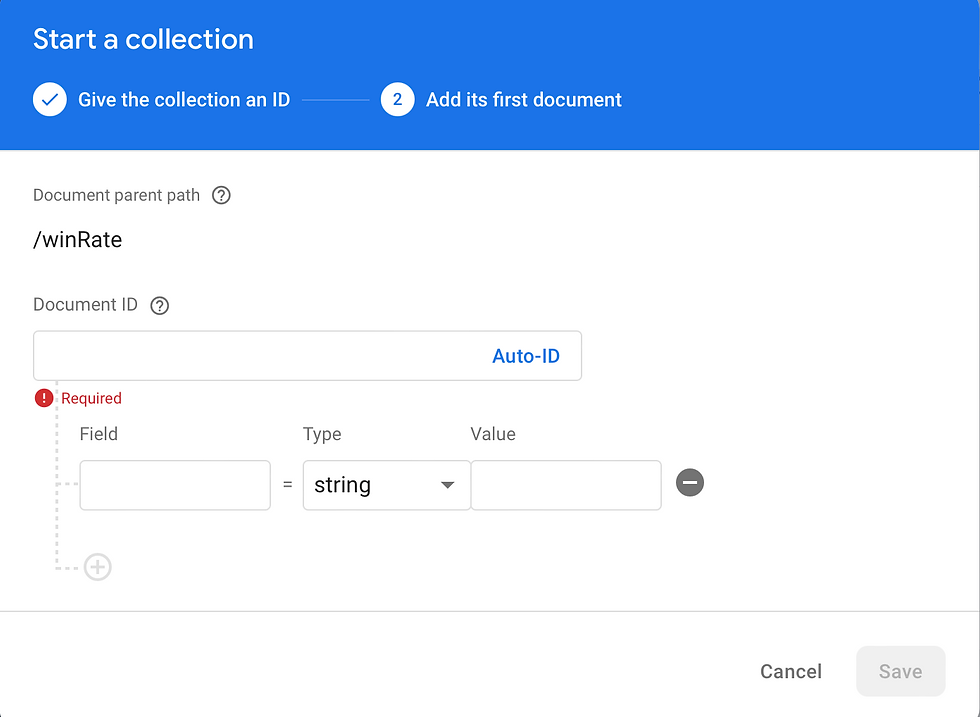
In each document, we will create another "characterWinRate" collection. The date will as a document id, which will contain the percentage of wins for that day.

Let's start improving our code. First of all, let's add a new WinRate model. It will only contain id and win percentage. Let's generate it using freezed.
@freezed
abstract class WinRate with _$WinRate{

  const WinRate._();

  const factory WinRate({
    String? id,
    required int value,
  }) = _WinRate;

  factory WinRate.empty() => WinRate(value: 0);

  factory WinRate.fromJson(Map<String,dynamic> json) => _$WinRateFromJson(json);

  factory WinRate.fromDocument(DocumentSnapshot doc){
    final data = doc.data()! as Map<String, dynamic>;
    return WinRate.fromJson(data).copyWith(id: doc.id);
  }

  Map<String, dynamic> toDocument() => toJson()..remove('id');
}
Let's create a new repository to interact with the database. Our application will only implement the functionality of reading the win rating from the database and displaying it as a chart.
Future<List<WinRate>> getWinRate(String characterId) async {
  try {
    final snap = await _ref.read(firebaseFirestoreProvider)
        .characterWinRateRef(characterId)
        .get();
    return snap.docs.map((doc) => WinRate.fromDocument(doc)).toList();
  } on FirebaseException catch (e) {
    throw CustomException(message: e.message);
  }
}
Here it is worth paying attention to the creation of an extension to reduce code duplication in the future.
extension FirebaseFirestoreX on FirebaseFirestore {
  CollectionReference characterWinRateRef(String characterId) =>           collection('winRate').doc(characterId).collection('characterWinRate');
}
Each character can contain the rating of their victories, so we need to add a new property "rates" to the Character model.
const factory Character({
  String? id,
  required String name,
  required String imgUrl,
  List<WinRate>? rates,
}) = _Character;
Now we need to slightly edit the method of obtaining characters in the repository, in order to organize the connection between our models.
@override
Future<List<Character>> retrieveCharacters() async {
  try {
    final snap = await _ref.read(firebaseFirestoreProvider)
        .collection('characters')
        .get();
    return Future.wait(
        snap.docs.map(
                (doc) async {
                  Character character = Character.fromDocument(doc);
                  final rates = await _ref.read(charactersWinRateRepositoryProvider).getWinRate(character.id!);
                  return character.copyWith(rates: rates);
                }
        ).toList()
    );
  } on FirebaseException catch (e) {
    throw CustomException(message: e.message);
  }
}
Let's move on to the formation of the chart, which we will later send to the widget. I suggest using the Syncfusion Flutter Charts package. It provides convenient tools for creating charts of varying complexity. For our application, the simplest SplineChart will do, the design of which we will improve with the help of markers and a gradient.
SfCartesianChart(
    plotAreaBorderWidth: 0,
    key: cartesianChartKey,
    primaryXAxis: CategoryAxis(
        isVisible: mode == ChartMode.full? true : false
    ),
    primaryYAxis: CategoryAxis(
        isVisible: mode == ChartMode.full? true : false
    ),
    series: <ChartSeries<WinRate, String>>[
      SplineAreaSeries<WinRate, String>(
          splineType: SplineType.natural,
          dataSource:  character.rates!,
          xValueMapper: (WinRate rate, _) => rate.id,
          yValueMapper: (WinRate rate, _) => rate.value,
          gradient: LinearGradient(
              colors: [
                AppColors.spline_color,
                Colors.transparent,
              ],
              begin: Alignment.topCenter,
              end: Alignment.bottomCenter
          )
      ),
      SplineSeries(
          dataSource:  character.rates!,
          xValueMapper: (WinRate rate, _) => rate.id,
          yValueMapper: (WinRate rate, _) => rate.value,
          color: AppColors.accent_color,
          width: 4,
          markerSettings: MarkerSettings(
            isVisible: true,
            color: AppColors.spline_color,
            borderWidth: 3,
            borderColor: AppColors.accent_color,
            shape: DataMarkerType.circle,
          )
      )
    ]
);
In addition, we will create an enum called ChartMode, with the help of which we will control the appearance of the output chart (with and without axes).
When you add a chart to your character page, you should get the following.
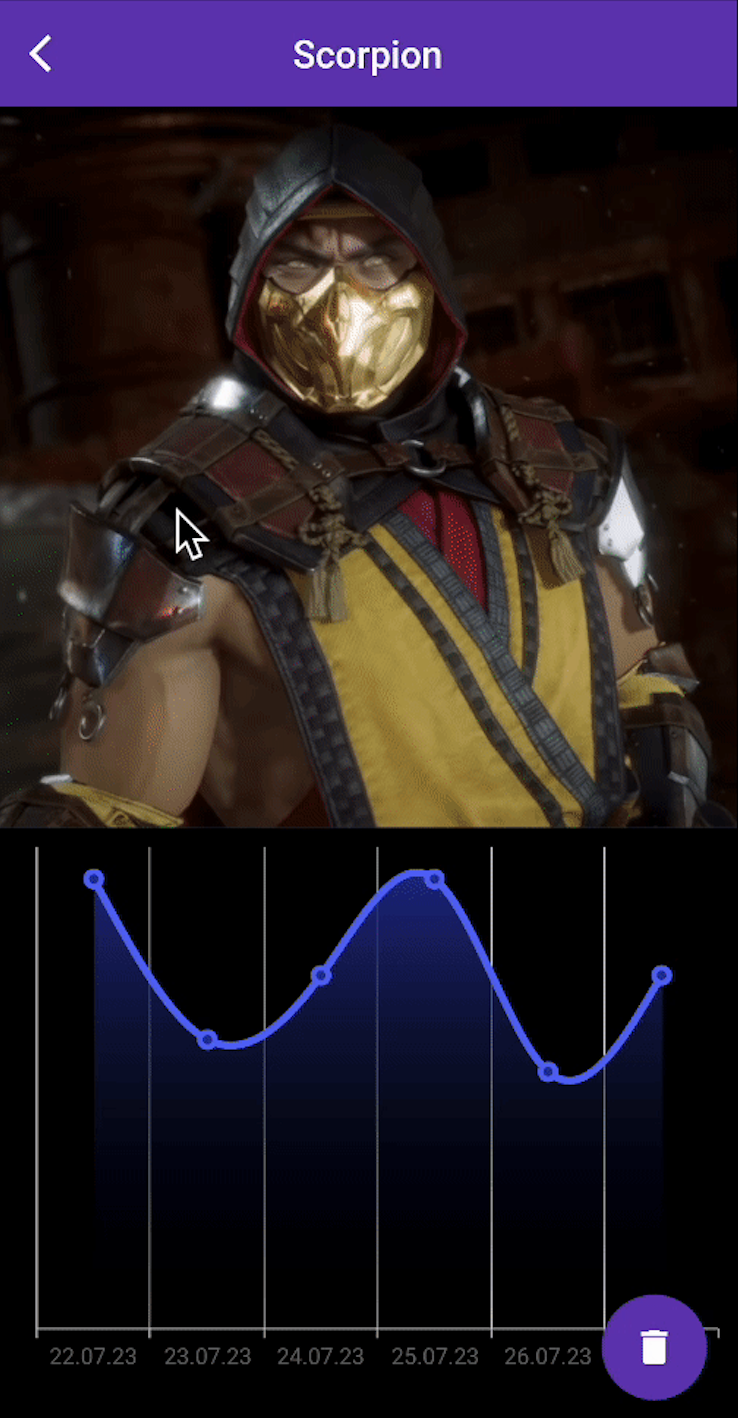
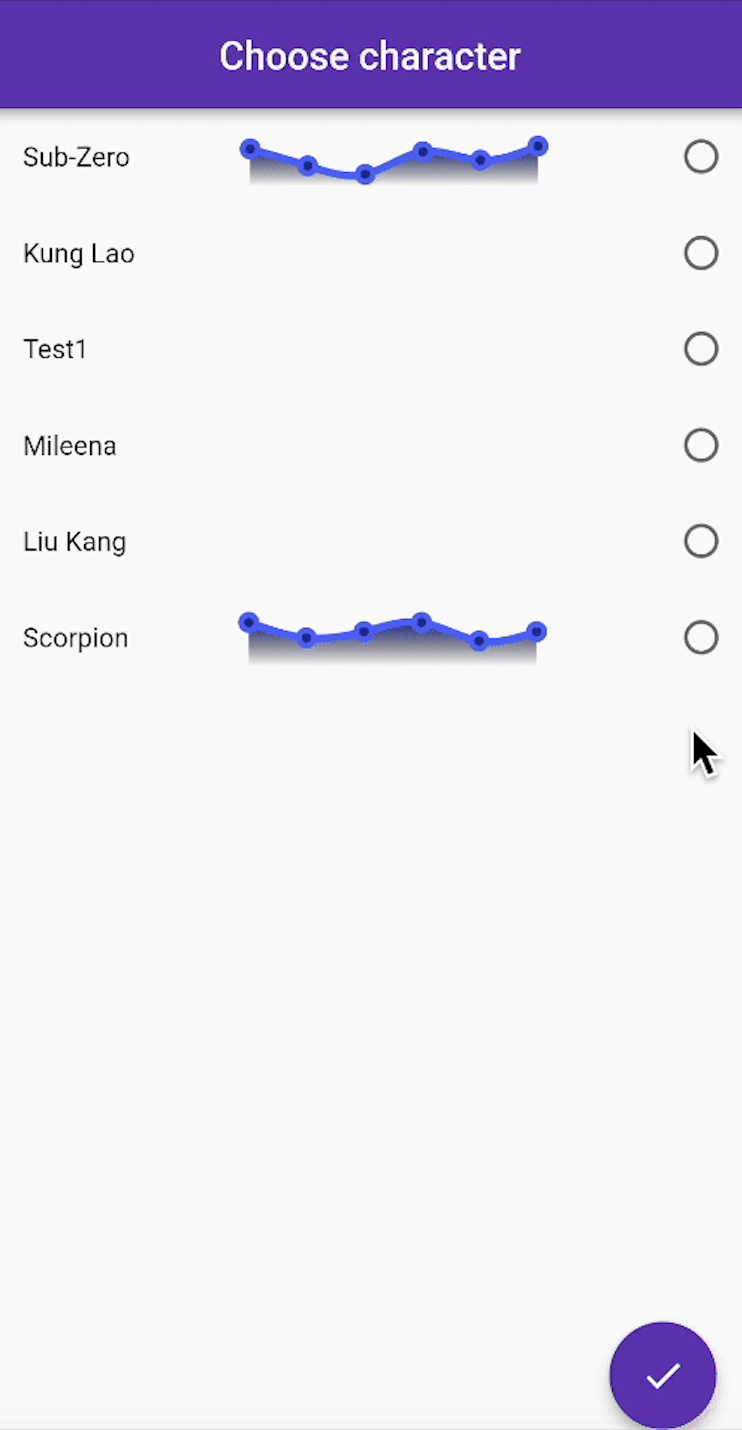
To convert the chart into an image, we will use the GlobalKey<SfCartesianChartState> whose state we will convert. However, here it should be taken into account that the state can be obtained only if our chart is in the widget tree, and for this it needs to be created and displayed on the screen. In this regard, on the page with a choice, it is worth supplementing each character with a chart as follows. In this case, it is worth choosing ChartMode.short for the minimization of the chart.
In the last article, we created an ImageHelper to download images and save them to the device's memory. Now we will add a new method to it to convert the widget into an image and then save it.
Future<String> saveWidgetToImage(
  GlobalKey<SfCartesianChartState> key,
  String widgetId) async {
  final ui.Image data = await key.currentState!.toImage(pixelRatio: 3.0);
  final ByteData? bytes = await data.toByteData(format: ui.ImageByteFormat.png);
  final List<int> imageBytes = bytes!.buffer.asUint8List(bytes.offsetInBytes, bytes.lengthInBytes);
  final String filename = 'mk/$widgetId/statisticImg.png';
  return saveFile(filename, imageBytes);
}
It remains to organize the method of sending data in our controller. In addition to the character image, his name and chart, we will also send some statistics: the percentage of wins on the last day, the maximum percentage of wins and the difference between the percentages for the last two days.
Future<void> sendCharacterWithChartToWidget(
  String widgetId,
  Character character,
  GlobalKey<SfCartesianChartState> cartesianChartKey) async {
  try {
    String statisticImg = await ImageHelper().saveWidgetToImage(cartesianChartKey, widgetId);
    String characterImgName = 'mk/$widgetId/characterImg.png';
    String? characterImg = await ImageHelper().downloadImage(character.imgUrl, characterImgName);
    await HomeWidget.saveWidgetData<String>(
        widgetId,
        jsonEncode({
          'id': character.id,
          'name': character.name,
          'img': characterImg,
          'statistic': {
            'statisticLast': character.rates!.last.value,
            'statisticHigh': character.rates!.reduce((f, s) => f.value > s.value ? f : s).value,
            'statisticDiff': character.rates!.last.value - character.rates![character.rates!.length - 2].value,
            'img': statisticImg
          }
        })
    );
    await HomeWidget.updateWidget(name: 'StatisticWidgetProvider', iOSName: 'StatisticWidgetProvider');
  } on CustomException catch (e) {
    _ref.read(charactersExceptionProvider.notifier).state = e;
  }
}
Let's move to Android.
First of all, let's create a new layout, call it widget_winrate_layout.xml and place elements in it to display our information, as well as a button to select a character.
The start widget is not much different from the one we created earlier.

In addition, you need to add the widget configuration. Let's create an xml/widget_statistic_info.xml file and define some window sizes in it.
<appwidget-provider xmlns:android="http://schemas.android.com/apk/res/android"
    android:initialLayout="@layout/widget_winrate_layout"
    android:minWidth="300dp"
    android:minHeight="250dp"
    android:minResizeWidth="300dp"
    android:minResizeHeight="250dp"
    android:resizeMode="horizontal|vertical"
    android:widgetCategory="home_screen" />
Next, we will create a file com/example/mortal_combat/StatisticWidgetProvider.java in which we will also override onDelete and onUpdate methods.
@Override
public void onUpdate(Context context, AppWidgetManager appWidgetManager, int[] appWidgetIds, SharedPreferences sp) {
    for (int id : appWidgetIds) {
        RemoteViews views = new RemoteViews(context.getPackageName(), R.layout.widget_winrate_layout);
        PendingIntent pendingIntent = HomeWidgetLaunchIntent.INSTANCE.getActivity(context, MainActivity.class, Uri.parse("myappwidget://mortal_kombat.com/chooseCharacter?widgetId=" + id + "&mode=statistic"));
        views.setOnClickPendingIntent(R.id.add_bt, pendingIntent);
        String characterJson = sp.getString(String.valueOf(id),null);
        System.out.println(id);
        Gson gson = new Gson();
        Map character = null;
        if(characterJson != null) {
            character = gson.fromJson(characterJson, Map.class);
            System.out.println(characterJson);
        }
        if (character != null){
            System.out.println(character);
            String characterPath = String.valueOf(character.get("img"));
            if(characterPath != null){

                String characterId = String.valueOf(character.get("id"));
                PendingIntent imgPendingIntent = HomeWidgetLaunchIntent.INSTANCE.getActivity(context, MainActivity.class, Uri.parse("myappwidget://mortal_kombat.com/characters/" + characterId));
                views.setOnClickPendingIntent(R.id.character_info, imgPendingIntent);

                views.setViewVisibility(R.id.add_bt, View.GONE);

                String characterName = String.valueOf(character.get("name"));
                System.out.println(characterName);
                views.setTextViewText(R.id.character_name, characterName);
                ImageHelper.setImageFromPath(characterPath,R.id.character_image,views);
                views.setViewVisibility(R.id.character_info, View.VISIBLE);

                Map statistic = (Map) character.get("statistic");
                String statisticLast = "Last: " + statistic.get("statisticLast") + "%";
                views.setTextViewText(R.id.last_stat, statisticLast);
                String statisticHigh = "High: " + statistic.get("statisticHigh") + "%";
                views.setTextViewText(R.id.high_stat, statisticHigh);
                double statisticDiff = (double) statistic.get("statisticDiff");
                String diffOutput;
                String diffColor;
                if(statisticDiff > 0) {
                    diffOutput = "Increase on " + statisticDiff + "%";
                    diffColor = "#4CAF50";
                } else {
                    diffOutput = "Decrease on " + statisticDiff + "%";
                    diffColor = "#C30E14";
                }
                views.setTextViewText(R.id.diff_stat, diffOutput);
                views.setTextColor(R.id.diff_stat, Color.parseColor(diffColor));

                String statisticPath = String.valueOf(statistic.get("img"));
                ImageHelper.setImageFromPath(statisticPath,R.id.winrate_chart,views);
                views.setViewVisibility(R.id.statistic_info, View.VISIBLE);
            }
        }

        appWidgetManager.updateAppWidget(id, views);
    }
}
In general terms, the logic is very similar to the previous widget. Here, an event is also added to the button, when data is received, the button is removed, a block with information about the character appears, and a click event is hung on this block. Next, the statistics data is read, the difference values are checked to determine what color this information should be displayed. At the end, all changes are applied to our widget.
After creating all the necessary files, you need to update the information in AndroidManifest.xml with information about the new widget.
<receiver
    android:name=".StatisticWidgetProvider"
    android:exported="true"
    android:label="MK Statistics">
    <intent-filter>
        <action
            android:name="android.appwidget.action.APPWIDGET_UPDATE">
        </action>
    </intent-filter>
    <meta-data
        android:name="android.appwidget.provider"
        android:resource="@xml/widget_statistic_info">
    </meta-data>
</receiver>
Thus, we have analyzed the process of creating a full-fledged informative widget, as well as the mechanism for converting a graph into images. In addition to the graph, we can also convert other Flutter widgets, for this the easiest way is to use the widget_to_image package or any other.
Useful links:
https://github.com/TwiXyl9/mortal_kombat - repo with realization
https://firebase.google.com - firebase official website
https://pub.dev/packages/home_widget - home widget package
https://pub.dev/packages/firebase_core - plugin for firebase
https://pub.dev/packages/syncfusion_flutter_charts - package for charts


Commenti