Flutter Mortal Kombat app with HomeScreen Widget
- Yulian Airapetov
- Aug 24, 2023
- 6 min read
In this article, I will show you how to create Android widgets using Flutter and Firebase.
A widget is a small graphical application that displays information on a computer desktop, smartphone/tablet screen, or website page.
First of all, let's set up firebase to store our data. You should log into your Google account and then create a new firebase project for our future application.
Next, you need to configure our Flutter project to interact with firebase, for this you can use the instructions on the main page of the project.

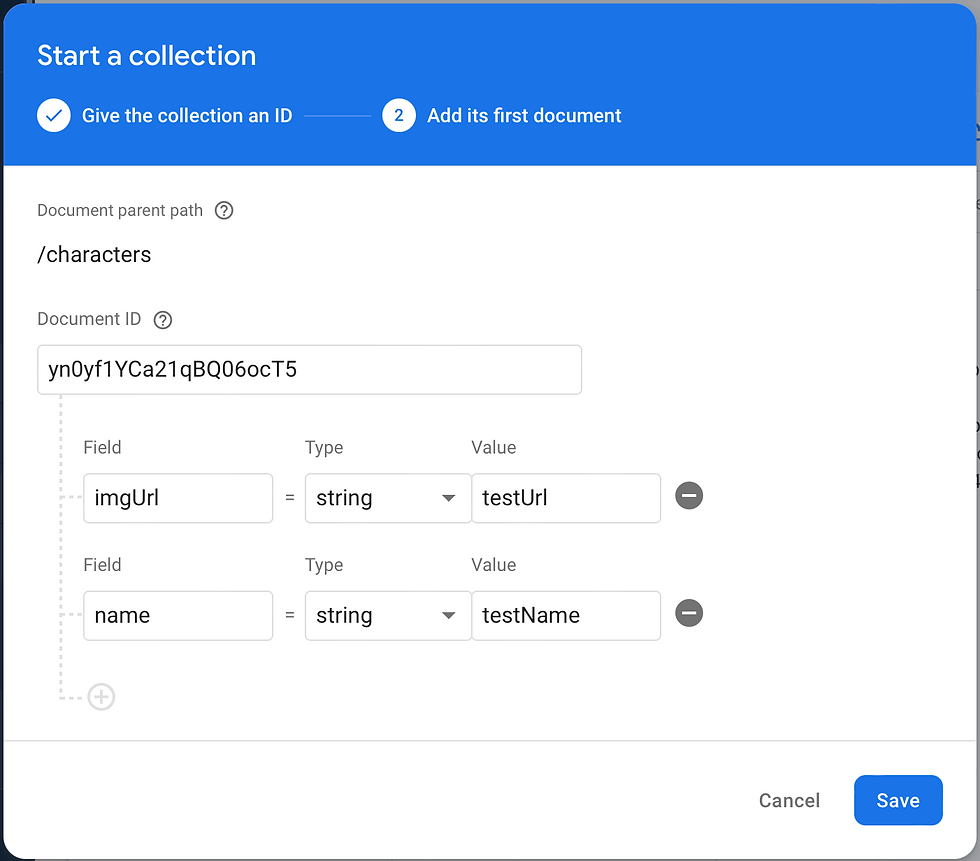
After completing the configuration, you should add a few tools, namely Firestore Database and Storage for storing data and files, respectively. Let's create our database structure, name of the main collection is "characters", choose automatic id generation, and add 2 fields: "imageUrl" and "name".
With the Storage setting it's much easier, we only have to create a folder to store the images "images/".

The database logic is simple, we store the image in Storage, then we take its url and save it along with the character name already in the Firestore Database.
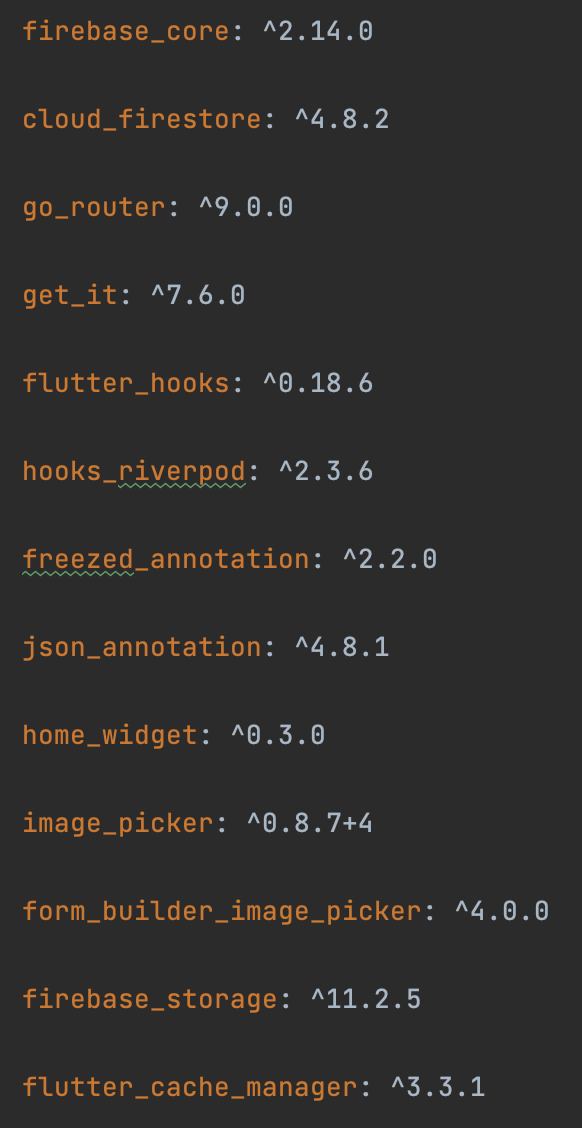
Let's move on to writing code. First, let's add the required libraries to the pubspec.yaml file. Most of them help manage states, build architecture, and simplify the process of creating components.
Let's generate a Character model with id, name and imgUrl fields using freezed.
@freezed
abstract class Character with _$Character{

  const Character._();

  const factory Character({
    String? id,
    required String name,
    required String imgUrl,
  }) = _Character;

  factory Character.empty() => Character(name: '', imgUrl: '');

  factory Character.fromJson(Map<String,dynamic> json) => _$CharacterFromJson(json);

  factory Character.fromDocument(DocumentSnapshot doc){
    final data = doc.data()! as Map<String, dynamic>;
    return Character.fromJson(data).copyWith(id: doc.id);
  }
  Map<String, dynamic> toDocument() => toJson()..remove('id');
}
Riverpod is responsible for state management in our project. To access the firebase services, we will create two providers in the general_providers.
final firebaseFirestoreProvider = Provider<FirebaseFirestore>((ref) => FirebaseFirestore.instance);
final firebaseStorageProvider = Provider<FirebaseStorage>((ref) => FirebaseStorage.instance);
The next step is to create repositories that will be used to add, delete, edit, and transform data in the database.
As an example, I will show a method for obtaining all the characters.
@override
Future<List<Character>> retrieveCharacters() async {
  try {
    final snap = await _ref.read(firebaseFirestoreProvider)
        .collection('characters')
        .get();
    return snap.docs.map((doc) => Character.fromDocument(doc)).toList();
  } on FirebaseException catch (e) {
    throw CustomException(message: e.message);
  }
}
Next, we will create a controller that will transform objects directly for display on the screen, and will also respond to user events.
Future<void> retrieveCharacters({bool isRefreshing = false}) async {
  if(isRefreshing) state = AsyncValue.loading();
  try {
    final tasks = await _ref.read(charactersRepositoryProvider).retrieveCharacters();
    if (mounted) {
      state = AsyncValue.data(tasks);
    }
  } on CustomException catch (e, st) {
    state = AsyncValue.error(e, st);
  }
}
Our application will consist of several pages:
main page;
character list page;
page of a specific character;
character selection page for further placement in the widget.
A description of all these pages can be seen on GitHub. I will describe in detail the creation of a widget using the Home Widget package for Android.
To configure the Home Widget, let's add a couple of lines to main.
@pragma("vm:entry-point")
Future<void> backgroundCallback(Uri? uri) async {
}

void main() async {
  WidgetsFlutterBinding.ensureInitialized();

  await Firebase.initializeApp(
    options: DefaultFirebaseOptions.currentPlatform,
  );
  HomeWidget.setAppGroupId("mk_widget");
  HomeWidget.registerBackgroundCallback(backgroundCallback);
  HomeWidget.initiallyLaunchedFromHomeWidget();
  setupLocator();
  runApp(
      const ProviderScope(
          child: MyApp()
      )
  );
}
In our case, the backgroundCallback method is empty, since the widget sends requests to our application through deep links, which are processed using go_router.
final GoRouter router = GoRouter(
routes: [
GoRoute(path: rootRoute, builder: ((context, state) => const HomeScreen())),
GoRoute(
path: charactersRoute,
builder: ((context, state) => const CharactersScreen()),
routes: [
GoRoute(
name:"character",
path: ":id",
builder: ((context, state) {
final id = state.pathParameters['id'];
return CharacterItemScreen(id: id!,);
})
),
]
),
GoRoute(
name: chooseCharacterRoute,
path: chooseCharacterRoute,
builder: ((context, state) {
String widgetId = state.queryParameters['widgetId']!;
String mode = state.queryParameters['mode']!;
return CharacterChooseScreen(widgetId: widgetId, mode: mode);
})
),
],
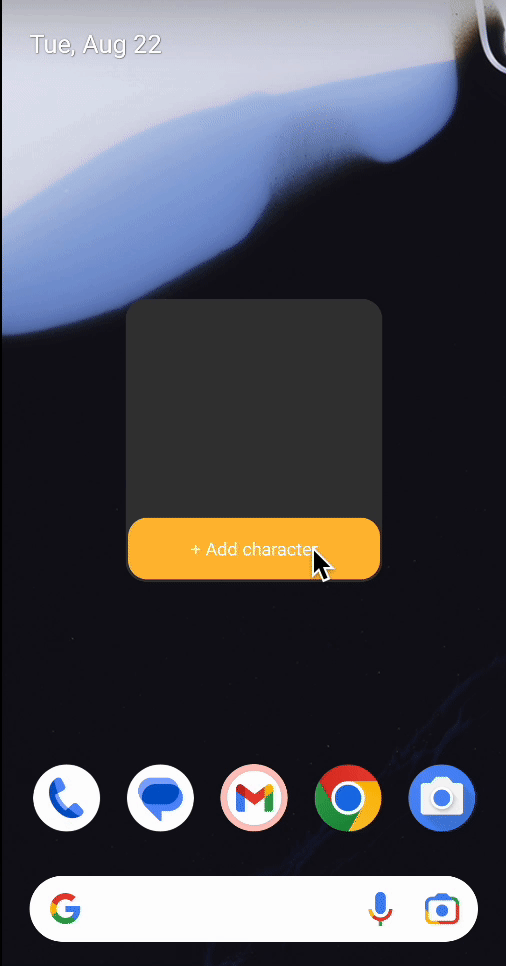
);The functionality is as follows: the user creates a widget on the desktop, then clicks on the button for adding a character, the application opens on the page with a choice, after confirming the choice, the character data is stored in the device’s memory and read directly by the widget for further output.
Saving data and updating the widget is done using the HomeWidget package.
In the controller, we will create a method for sending data to the widget.
Future<void> sendCharacterToWidget(String widgetId, Character character) async {
  try {
    String characterImgName = 'mk/$widgetId/characterImg.png';
    String? characterImg = await ImageHelper().downloadImage(character.imgUrl, characterImgName);
    await HomeWidget.saveWidgetData<String>(
        widgetId,
        jsonEncode({
          'id': character.id,
          'name': character.name,
          'img': characterImg
        })
    );
    await HomeWidget.updateWidget(name: 'CharacterWidgetProvider', iOSName: 'CharacterWidgetProvider');
  } on CustomException catch (e) {
    _ref.read(charactersExceptionProvider.notifier).state = e;
  }
}
This method takes the id of the widget and uses it as the key to save the data. In addition, the downloadImage method is used here to download an image from the cloud to the device's memory by url.
Future<String> downloadImage(String url, String filename) async {
    final http.Response response = await http.get(Uri.parse(url));
    return saveFile(filename ,response.bodyBytes);
}

Future<String> saveFile(String filename, List<int> bytes) async {
  final Directory directory = await getApplicationSupportDirectory();
  final String path = directory.path;

  File file = File('$path/$filename');

  if (!await file.exists()) {
    await file.create(recursive: true);
  }

  await file.writeAsBytes(bytes, flush: true);

  return file.path;
}
Let's move on to the native part of our application.
First of all, let's add lines to AndroidManifest to accept deep links and home widget.
<manifest xmlns:android="http://schemas.android.com/apk/res/android">
    <uses-permission android:name="android.permission.INTERNET"/>
    <application
        android:label="mortal_kombat"
        android:requestLegacyExternalStorage="true"
        android:name="${applicationName}"
        android:icon="@mipmap/ic_launcher">
        <activity
            android:name=".MainActivity"
            android:exported="true"
            android:enableOnBackInvokedCallback="true"
            android:launchMode="singleTop"
            android:theme="@style/LaunchTheme"
            android:configChanges="orientation|keyboardHidden|keyboard|screenSize|smallestScreenSize|locale|layoutDirection|fontScale|screenLayout|density|uiMode"
            android:hardwareAccelerated="true"
            android:windowSoftInputMode="adjustResize">

            <meta-data
              android:name="io.flutter.embedding.android.NormalTheme"
              android:resource="@style/NormalTheme" />

            <meta-data android:name="flutter_deeplinking_enabled" android:value="true" />

            <intent-filter>
                <action android:name="android.intent.action.MAIN"/>
                <category android:name="android.intent.category.LAUNCHER"/>
            </intent-filter>
            <intent-filter>
                <action android:name="android.intent.action.VIEW" />
                <category android:name="android.intent.category.DEFAULT" />
                <category android:name="android.intent.category.BROWSABLE" />
                <data android:scheme="myappwidget"
                    android:host="mortal_kombat.com" />
            </intent-filter>
        </activity>

        <meta-data android:name="flutterEmbedding" android:value="2" />
        <receiver
            android:name=".CharacterWidgetProvider"
            android:exported="true"
            android:label="MK Character">
            <intent-filter>
                <action
                    android:name="android.appwidget.action.APPWIDGET_UPDATE">
                </action>
            </intent-filter>
            <meta-data
                android:name="android.appwidget.provider"
                android:resource="@xml/widget_character_info">
            </meta-data>
        </receiver>
        <receiver android:name="es.antonborri.home_widget.HomeWidgetBackgroundReceiver" android:exported="true">
            <intent-filter>
                <action android:name="es.antonborri.home_widget.action.BACKGROUND" />
            </intent-filter>
            <intent-filter>
                <action android:name="es.antonborri.home_widget.action.LAUNCH" />
            </intent-filter>
        </receiver>
        <service android:name="es.antonborri.home_widget.HomeWidgetBackgroundService"
            android:permission="android.permission.BIND_JOB_SERVICE" android:exported="true"/>
    </application>
</manifest>
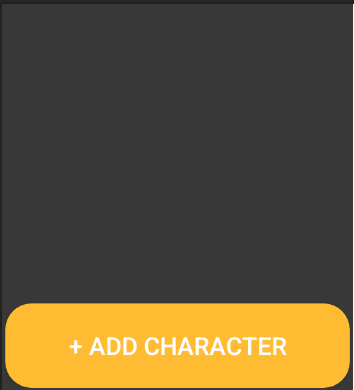
Let's create a file for designing the appearance of our widget along the res/layout/widget_character_layout.xml route.
<?xml version="1.0" encoding="utf-8"?>
<FrameLayout xmlns:android="http://schemas.android.com/apk/res/android"
xmlns:tools="http://schemas.android.com/tools"
android:id="@+id/widget_root"
android:layout_width="200dp"
android:layout_height="220dp">
<RelativeLayout
android:layout_width="match_parent"
android:layout_height="match_parent"
android:background="@drawable/rounded_layout"
android:backgroundTint="#383838">
<Button
style="@style/AddButtonStyle"
android:id="@+id/add_bt"
android:maxHeight="20dp"
android:layout_width="match_parent"
android:layout_height="wrap_content"
android:layout_below="@+id/widget_image"
android:layout_alignParentBottom="true"
android:layout_marginTop="8dp"
android:gravity="center"
android:padding="12dp"
android:text="+ Add character"
android:textColor="@android:color/white"
android:textSize="14sp"
android:background="@drawable/rounded_layout"
android:backgroundTint="@android:color/holo_orange_light"/>
<ImageView
android:id="@+id/widget_image"
android:layout_width="match_parent"
android:layout_height="match_parent"
android:layout_centerInParent="true"
android:background="@drawable/rounded_layout"
android:visibility="gone"/>
<TextView
android:id="@+id/widget_text"
android:layout_width="wrap_content"
android:layout_height="wrap_content"
android:layout_alignParentBottom="true"
android:layout_centerHorizontal="true"
android:textColor="#FFFFFF"
android:textSize="20sp"
android:visibility="gone" />
</RelativeLayout>
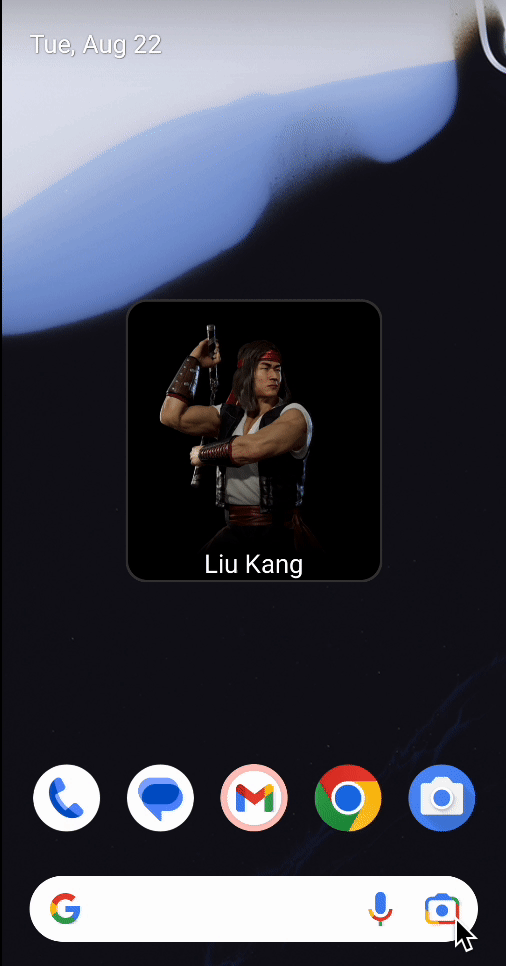
</FrameLayout>Below are the widget before and after character selection.

The next step is to create a configuration for our widget. In our case, it describes the dimensions of the widget.
<appwidget-provider xmlns:android="http://schemas.android.com/apk/res/android"
    android:initialLayout="@layout/widget_character_layout"
    android:minWidth="150dp"
    android:minHeight="200dp"
    android:minResizeWidth="200dp"
    android:minResizeHeight="150dp"
    android:resizeMode="horizontal|vertical"
    android:widgetCategory="home_screen" />
It remains only to create a file where the logic of our application will be located. Let's call it the same as in the manifest - CharacterWidgetProvider. Let's inherit it from HomeWidgetProvider and override the onUpdate and onDelete methods.
The onDelete method cleans up memory when the widget is removed from the desktop.
@Override
public void onDeleted(Context context, int[] appWidgetIds) {
        for (int id : appWidgetIds) {
                super.onDeleted(context, appWidgetIds);
                SharedPreferences sp = HomeWidgetPlugin.Companion.getData(context);
                sp.edit().remove(String.valueOf(id)).apply();
        }

}
And the onUpdate method is triggered when the widget is created and updated. In it, we create RemoteViews to interact with our widget. Next, we initialize the event, add a transition link to it and hang it on our add character button.
RemoteViews views = new RemoteViews(context.getPackageName(), R.layout.widget_character_layout);
                PendingIntent pendingIntent = HomeWidgetLaunchIntent.INSTANCE.getActivity(context, MainActivity.class, Uri.parse("myappwidget://mortal_kombat.com/chooseCharacter?widgetId=" + id + "&mode=character"));
                views.setOnClickPendingIntent(R.id.add_bt, pendingIntent);
The next step is to check the presence of data in memory, if it is available in json pairs, we get the character image from it, transform it and set it using ImageHelper. Let's make our image visible. We hang an event for opening the character page when clicking on the image.
String characterJson = sp.getString(String.valueOf(id),null);
                Gson gson = new Gson();
                Map map = null;
                if(characterJson != null) {
                        map = gson.fromJson(characterJson, Map.class);
                }
                if (map != null){
                        System.out.println(map);
                        String imgPath = String.valueOf(map.get("img"));
                        if(imgPath != null){
                                ImageHelper.setImageFromPath(imgPath, R.id.widget_image, views);
                                views.setViewVisibility(R.id.widget_image, View.VISIBLE);

                                String characterId = String.valueOf(map.get("id"));
                                PendingIntent imgPendingIntent = HomeWidgetLaunchIntent.INSTANCE.getActivity(context, MainActivity.class, Uri.parse("myappwidget://mortal_kombat.com/characters/" + characterId));
                                views.setOnClickPendingIntent(R.id.widget_image, imgPendingIntent);
Then we read the name of the character and set it to the text field of our widget and also make it visible.
String characterName = String.valueOf(map.get("name"));
                                views.setTextViewText(R.id.widget_text, characterName);
                                views.setViewVisibility(R.id.widget_text, View.VISIBLE);
After that, we remove the button from the widget.
views.setViewVisibility(R.id.add_bt, View.GONE);At the final step, we make changes to the widget.
appWidgetManager.updateAppWidget(id, views);So we have created a simple flutter app that interacts with an android widget and firestore data. Although the article is about widgets, our application also has functionality for adding, editing and deleting symbols.
In the next article, I will show you how to convert flutter widgets to images and add to a widget on android.
Useful links:
https://github.com/TwiXyl9/mortal_kombat - repo with realization
https://firebase.google.com - firebase official website
https://pub.dev/packages/home_widget - home widget package
https://pub.dev/packages/firebase_core - plugin for firebase


Comentarios