In recent years, the rapid advancement of artificial intelligence has transformed the way we interact with technology. From chatbots to voice-controlled assistants, AI is reshaping user experiences across industries. With the introduction of powerful models like OpenAI's GPT and Google's Gemini, developers now have unprecedented tools to create intelligent applications. These models bring conversational capabilities, contextual understanding, and problem-solving features that were once unimaginable.
For Flutter developers, integrating these AI models is now easier than ever. Combining Flutter's cross-platform power with AI can create advanced assistants that answer queries, provide recommendations, and enhance user engagement.
This article will guide you in building an AI-powered assistant in Flutter, covering API integration, best practices, and practical examples to help you develop innovative applications.

Before diving into state management and implementing the chat UI, let’s start by discussing how we’ll handle the chat functionality. Since we don’t need to create a custom chat interface for this task, we’ll be using the dash_chat_2 package.
This package provides a ready-to-use chat interface with customizable components. To ensure seamless interaction, we’ll make ChatMessage the central model, which includes key properties such as a unique identifier, text, author, timestamp, and additional metadata like delivery status. Using ChatMessage simplifies state management and integrates smoothly with the chat components offered by the package, allowing for a more efficient and flexible approach to building the chat experience.
With the data model in place, we can now move on to state management. For this, we use Riverpod, a powerful library that helps organize data storage and updates within the application. The primary state in our case will be a dynamic list of ChatMessage objects.
To manage this state, we create a MessageController that handles the logic for adding and removing messages. The controller is registered via a messageControllerProvider, enabling seamless access and interaction with the state across the app.
final messagesControllerProvider = StateNotifierProvider <MessageController,AsyncValue<List<ChatMessage>>>((ref) => MessageController(ref));Next, let's create methods for adding and deleting our messages:
Future<void> add(ChatMessage message) async {
	state = AsyncValue.data([message, ...state.value!]);
}
Future<void> deleteAll() async {
state = const AsyncValue.data([]);
}Now that we have established the foundation with our data model and state management, it’s time to move on to creating the UI widget for our chat. dash_chat_2 package offers the DashChat widget, which can be tailored to match our design preferences and integrated effortlessly with our state management logic.
DashChat(
	currentUser: user,
    inputOptions: InputOptions(
    	inputDisabled: _inputDisabled,
    ),
	onSend: (message) async {
    	setState(() {_inputDisabled = true;});
        message.text = message.text.trim();
        if(message.text.isEmpty) return;

        await ref
              .read(messagesControllerProvider.notifier)
              .add(message, image: selectedImg);

         setState(() {
         	_inputDisabled = false;
         });
     },
     messages: messages,
),
I also created button for deleting all messages from our chat and placed it in AppBar:
AppBar(
	title: const Text('Assistant'),
	backgroundColor: Colors.blue,
	actions: [
    	IconButton(
        	icon: const Icon(Icons.refresh),
        	onPressed: () async {
            	await ref
				    .read(messagesControllerProvider.notifier)
				    .deleteAll();
            },
          ),
        ],
    ),
Here is the result of our previous actions:
After building the UI and implementing the core functionality for sending and deleting messages, we move on to generating responses to our questions.
Flutter apps interact with third-party APIs by sending HTTP requests and processing their responses. Additionally, there are several packages that simplify this process by providing convenient models and methods for managing requests and responses.
Gemini API
To interact with the Gemini API, you'll need to obtain an API key. Visit aistudio.google.com, sign in to your account, and generate the key.
In our project, private keys will be stored in a .env file using the flutter_dotenv library.

The primary package for working with the Gemini API is flutter_gemini. This package allows seamless integration of Google's Gemini AI into Flutter apps, offering advanced features such as multi-turn conversations, token management, and content embeddings.
Since this article will cover two main APIs, we'll add functionality to switch the assistant type using a DropdownButton in the AppBar.
DropdownButton(
	value: selectedChat,
    onChanged: (Chats? newValue) {
    	if (newValue != null) {
        	ref
			.read(selectedChatProvider.notifier)
			.updateSelectedType(newValue);
        }
    },
    items: Chats.values.map((Chats chat) {
    	return DropdownMenuItem<Chats>(
        	value: chat,
            child: Text(chat.name),
        );
    }).toList(),
),
To track changes to the current assistant, we'll create a SelectedChatNotifier with a method updateSelectedType:
enum Chats {gemini, openAI}

final selectedChatProvider = StateNotifierProvider<SelectedChatNotifier, Chats>(
        (ref) => SelectedChatNotifier(ref));

class SelectedChatNotifier extends StateNotifier<Chats> {
  final Ref _ref;
  SelectedChatNotifier(this._ref) : super(Chats.gemini);

  void updateSelectedType(Chats newChat) {
    if (state != newChat) state = newChat;
  }
}
Some requests may take longer to generate a response. To address this, let's add a temporary message, "Assistant is typing...", which will appear until the Assistant sends the first characters of the reply. Since this message is purely for visualization, it should not be stored as part of the chat history. To handle this, we'll add a customProperties field with "isTyping".
void _addAssistantTypingMessage(){
    final message = _createAssistantAnswer(
        'Assistant is typing...',
        customProperties: {'isTyping': true}
    );
    state = AsyncValue.data([message, ...state.value!]);
}
Let's create getAnswerGemini method in our controller, we will be use streamChat method to get answer symbolically:
  Future<void> getAnswerGemini() async {
    try {
      final history = state.value!.map((message) {
        return [
          if(message.customProperties?['isTyping'] != true)
            Content(
            	parts: [
              		Part.text(message.text)
            	],
           	 	role: message.user.firstName == 'user' ? 'user' : 'model',
          	)
        ];
      }).toList();

      String answer = '';

      _ref.read(geminiProvider).streamChat(
      	history.reversed.expand((innerList) => innerList),
      ).listen((res) {
        answer += (res.content!.parts!.first as TextPart).text;
        state.value!.first = _createAssistantAnswer(answer);
        state = AsyncValue.data(state.value!);
      });
    } on Exception catch (e, st) {
      state = AsyncValue.error(e, st);
    }
  }
OpenAI API
For working with the OpenAI API in Flutter, one of the best solutions is the chat_gpt_sdk package. It offers a convenient and intuitive interface for interacting with OpenAI, supporting the latest API versions and providing features such as sending requests, managing threads, and working with models. Additionally, chat_gpt_sdk simplifies the integration of complex scenarios, reducing manual effort and enhancing development efficiency.

As with the Gemini API, you first need to generate an API key on platform.openai.com.
Next, let's create a method for generating the assistant's response:
Future<void> _getAnswerGPT() async {
	try {
      final history = state.value!.map((message){
        return message.customProperties?['isTyping'] != true ? {
          "role": message.user.firstName == 'user' ? 'user' : 'assistant',
          "content": [
            {
              "type": "text",
              "text": message.text
            },
          ],
        } : null;
      }).whereType<Map<String, dynamic>>().toList();

      final request = gpt.ChatCompleteText(
        model: gpt.Gpt4OChatModel(),
        maxToken: 200,
        temperature: 0.0,
        messages: history.reversed.toList(),
      );

      String answer = '';
      _ref.read(openAIProvider).onChatCompletionSSE(
	    request: request).listen((res) {
        	answer += res.choices!.first.message!.content;
        	state.value!.first = _createAssistantAnswer(answer);
        	state = AsyncValue.data(state.value!);
      	});
    } on Exception catch (e, st) {
      state = AsyncValue.error(e, st);
    }
}
To avoid checking the selected chat state in the UI, let's create a universal getAnswer method in our controller:
Future<void> getAnswer(Chats chat) async {
    _addAssistantTypingMessage();
    switch (chat) {
      case Chats.gemini: _getAnswerGemini();
      case Chats.openAI: _getAnswerGPT();
    }
}
As we can see, switching between chats resets the chat history. To address this, the history should be saved either in a file or remotely.
One of the most optimal solutions is saving the history in Firestore. Additionally, since our Gemini and OpenAI APIs can process images, using Firebase will simplify not only storing text messages but also photos.
A detailed guide on setting up Firebase and creating repositories can be found in this article.
To load the chat history, let's create a getAll method and call it in the constructor of our controller:
Future<void> getAll() async {
    try {
      state = const AsyncValue.loading();
      String chatName = _ref.read(selectedChatProvider).name;
      final messages = await _ref.read(messagesRepositoryProvider).getAll(chatName);
      messages.sort((a, b) => b.createdAt.compareTo(a.createdAt));
      if (mounted) {
        state = AsyncValue.data(messages);
      }
    } on Exception catch (e, st) {
      state = AsyncValue.error(e, st);
    }
  }
To allow image selection, we'll add a button next to the text input field in our chat interface
InputOptions(
	inputDisabled: _inputDisabled,
    leading: [
    	IconButton(
    	    icon: const Icon(Icons.image),
            onPressed: () => _selectImg(),
        ),
    ],
),
Additionally, since the dash_chart_2 package lacks a built-in function to preview images before sending, we'll overlay our chat on a stack and display the selected image below the chat. We'll also add a close icon (X) to the image, allowing users to delete it if needed.
if (_selectedImg != null)
	Padding(
    	padding: const EdgeInsets.only(bottom: 30),
        child: Stack(
 	       children: [
          	 Container(
              	decoration: BoxDecoration(
                 	border: Border.all(color: Colors.grey),
					borderRadius: BorderRadius.circular(8),
              	),
                 child: ClipRRect(
                 	borderRadius: BorderRadius.circular(8),
                     child: Image.file(
                     	File(_selectedImg!.path),
                         fit: BoxFit.cover,
                         height: 100,
                     ),
                  ),
              ),
               Positioned(
               	right: 8,
                 top: 8,
                 child: GestureDetector(
                 	onTap: _removeImg,
                     child: const Icon(
                     	Icons.close,
                         size: 24,
                         color: Colors.white,
                   	),
                  ),
               ),
            ],
         ),
      ),
Since questions in the chat are sent via the history list, we just need to add the photo to our message in the add method. However, the photo must first be saved in Firestore before being included in the message.
if(image != null) {
        final imageUrl = await _ref.read(imagesRepositoryProvider).add(chatName, image: image);
        message.medias = [
          ChatMedia(
              url: imageUrl,
              fileName: image.name,
              type: MediaType.image
          )
        ];
}
The final step is to handle image processing when forming the chat history in the response retrieval methods.
For Gemini:
final history = await Future.wait(state.value!.map((message) async {
        return [
          if(message.customProperties?['isTyping'] != true)
            Content(
              parts: [
                if (message.medias != null && message.medias!.isNotEmpty)
                  Part.bytes((await ApiService.get(uri: message.medias!.first.url)).bodyBytes),
                Part.text(message.text),
              ],
              role: message.user.firstName == 'user' ? 'user' : 'model',
            )
        ];
      }));
For OpenAI:
final history = state.value!.map((message){
        return message.customProperties?['isTyping'] != true ? {
          "role": message.user.firstName == 'user' ? 'user' : 'assistant',
          "content": [
            {
              "type": "text",
              "text": message.text
            },
            if(message.medias != null && message.medias!.isNotEmpty)
              {
                "type": "image_url",
                "image_url": {"url": message.medias!.first.url}
              }
          ],
        } : null;
      }).whereType<Map<String, dynamic>>().toList();
Summary
In conclusion, integrating advanced AI models like OpenAI's GPT and Google's Gemini with Flutter opens up endless possibilities for creating intelligent and user-friendly applications. By combining Flutter's cross-platform versatility with the conversational and problem-solving capabilities of these AI models, developers can build innovative assistants that transform user interactions.
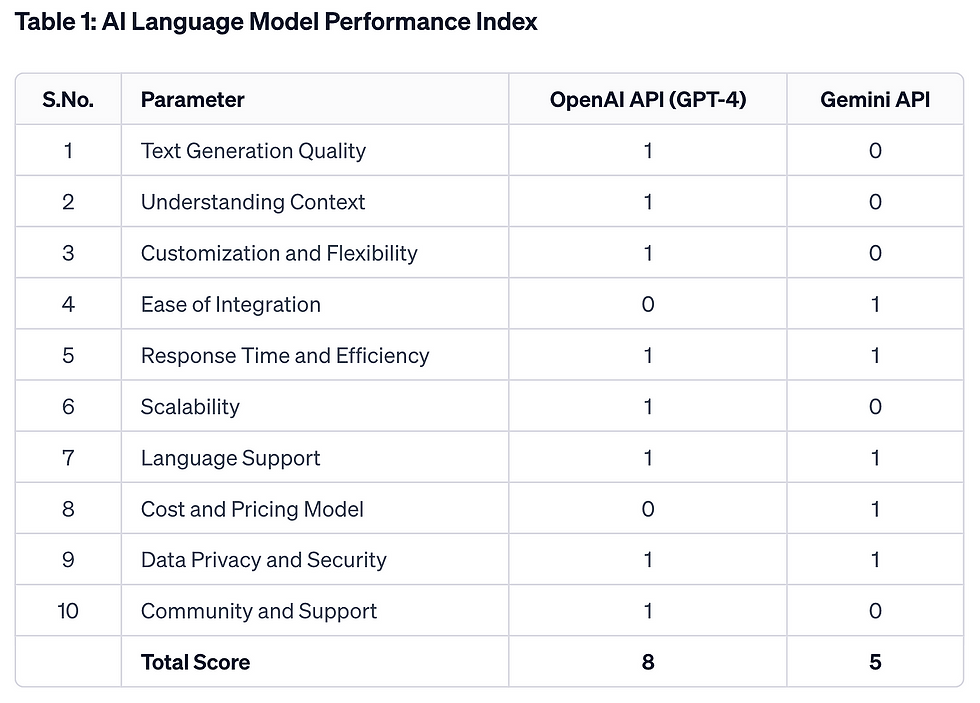
We've provided an example of working with Gemini and OpenAI APIs. Each developer is free to choose which API to use, as both have their advantages and disadvantages. A primary comparison is presented in the accompanying image to help you make an informed decision.
With the guidance provided in this article, you now have the tools and knowledge to develop powerful AI-driven solutions that elevate your app's functionality and user engagement.
There are also numerous methods to further enhance your chat functionality. You can send a database to the assistant, enabling it to reference specific information, or add a constant setup message to the history for contextual pre-configuration.
Next time, we will delve into creating an AI Consultant for a specific data catalog, exploring how to leverage AI to provide insightful recommendations and dynamic user experiences.
The full code from this article will be here.


Comments